Please note that ALL of the photos shown in this post are of the PROTOTYPE -
The FINAL VERSION is slightly different - I made THREE CHANGES -
On the prototype - the 1/4" line on the longest side is a solid line.
On the final version - it is a dashed line.
When you turn the ruler so that you can read "This Way For a STRAIGHT Cut" -
The prototype has the numbers in the second column reading 6-5-4-3-2-1 -
In the final version - the numbers read 1-2-3-4-5-6 from top to bottom.-
The prototype has no "hang-hole".
The final version has a "hang-hole" in the BOTTOM LEFT corner.
I plan to redo the demo with new photos soon - ;))
================================================================
Today I would like to introduce you to my new LEFT-EZE™ Rule -

And - just for fun -
I thought that I would do it in the form of a REVIEW -
Using the same format that I used to review the EASY SQUARE JR.
By Sharon Hultgren - EZ Quilting - Antioch, TN USA 37013
www - dot - ezquilting - dot - com - Made in China
My FAVORITE SQUARE ruler - ;))
So here goes -
============
LEFT-HANDED QUILTING - Review - Ruler - LEFT-EZE™ Rule
============
Note - these instructions are written in LEFT-EZE™.
If you are right-handed - just reverse the directions.
============
Today I want to show you a REALLY cool little ruler -
That Left-Handed Quilters can use - hassle-free - ;))
My
But first -
Disclaimer -
I AM
I did not get this product for FREE in exchange for a review - aka barter.
I designed it and I paid for it.
I have no intention of slandering or libeling anyone or any product.
I am simply stating my opinions - I could be wrong - you may disagree.
My opinions are based on my experience with this product - your results may vary.
I think that about covers it - if I missed something - let me know.
I am not a lawyer - and I am just trying to cover my assets. - ;))
===
It’s called the
LEFT-EZE™ Rule
By A Left-Handed Quilter™
www - dot - alefthandedquilter - dot - blogspot - dot - com
Made in the U.S.A.
Description -
This little ruler is a LEFT-Triangle - ;))
It can be used to cut Half-Square Triangles (HST) -
And Quarter-Square Triangles (QST) for Hourglass Blocks -
And Flying Geese units -
And Squares -
LEFT-HANDED!! - ;))
It measures 6-1/2” - technically 6-7/8" - but who's counting -
It has a 1/4” dashed line on the longest side -
The "hypotenuse" - for those of you who remember your high school Geometry class -
So that you can see that the "black tip" in the top right corner is a "dog-ear"
That will be automatically cut off because you are using pre-cut strips -
(The prototype has a solid line -
this is the first of 3 "cosmetic" changes that I made for the final version.)

===
Where you can get it -
For now this ruler is not available in your Local Quilt Shop -
Or from your favorite suppliers -
It is only available from me - on my blog(s) -
You can email me at - caseyq19 - at - gmail - dot - com -
And put "Waiting List" or "Order" in the subject line -
I will accept personal checks until I get set up with PayPal -
Please understand that it's only me -
And this will all be very "low-tech" until it becomes "high volume" - ;))
===
EDIT UPDATE -
For those of you who may have missed my previous posts -
And for those of you who are interested -
I approved the final artwork on the LEFT-EZE™ Rule and placed my first order last week. The guy at the manufacturer's office said that he "will be in touch in a few weeks, once I have a more accurate estimated production date."
Good thing I'm not in a hurry -
Or holding my breath - LOL - ;))
And I set up another (private) blog for my "shop" - LEFT-EZE™ Rule. I used it to post stuff for my "beta-testers" - so it has the "beta" tutorials. I was going to edit those down and wait to add new photos with the final version of the ruler - but since I don't know long it will take to actually GET them - I think I'll work on editing the tutorials down and just post them with the "prototype" photos. The changes that I made were only "cosmetic" - so the prototype is not that different from the final version. I'll try to get those done by the end of the week - so stay tuned - I'll let you know when they are ready - and when I change the blog to "public". (It is now "public".)
That way you can hop on over to the other blog and check out the design - and see how the ruler works. Then - if you're interested - I can make up an old-fashioned "waiting list". If you email me at "caseyq19 - at - gmail - dot - com" and put "Waiting List" in the subject line - I can add you to the list of "waiting" customers. I can't take "pre-orders" - because it's just me - and I don't have "PayPal" or the "postage" set up yet. This is all going to be very "low-tech" until it becomes very "high volume".
I'll be asking $24.95 plus shipping/handling and sales tax if applicable. I think it's a fair price - similar sized rulers on the market are priced at the same amount - and mine is special - different - LEFT-HANDED - and worth it - ;))
===
What I LIKE about this ruler -
It's LEFT-HANDED!! - ;))
The easy-to-read numbers down the right side -
The fact that the numbers read 1-2-3-4-5-6 from TOP to BOTTOM -
In the LEFT Column when you can read "This way for a DIAGONAL cut" -
And that they also read 1-2-3-4-5-6 from TOP to BOTTOM -
In the LEFT Column when you can read "This way for a STRAIGHT cut" -
(The prototype has the numbers in the second column reading 6-5-4-3-2-1 -
this is the second of 3 "cosmetic" changes that I made for the final version.)
And it has a "hang-hole" in the BOTTOM LEFT corner - ;))
The prototype has no "hang-hole" - this is the last of the 3 "cosmetic" changes that I made for the final version.)
===
What I DON’T like about this ruler -
There are no “grabber” thingys on the bottom side -
So it MAY slip on your fabric -
But that’s not really something that bothers me -
Because I don't usually have that problem -
And there are plenty of option if you choose to add them - ;))
===
How to USE the ruler -
Start with some pre-cut strips -
Either from your scrap bag -
Or of the size stated in a pattern -
You can also determine the width of strip that you want/need -
By using the LEFT-EZE™ Rule SIZE CHART -
Available at the top of this page - ;))
===
How I use it to Trim the Selvage end of the strips -
For Half-Square Triangles (HST) -
Start with two contrasting strips -
(I used pre-cut 2-1/2" strips for these demos)
And place them right sides together -

Line them up with a horizontal line on your cutting mat - to keep them straight -

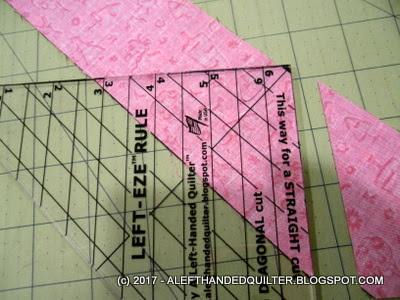
TURN the ruler so that you can read - This way for a STRAIGHT cut -

Line it up with a vertical line on your mat -
With the strip between ANY two horizontal lines -
Using the other horizontal lines to keep the ruler straight -

Cut UP the LEFT side of the ruler -

===
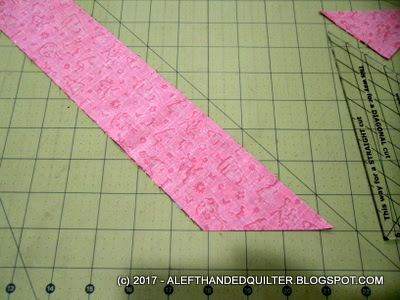
How I use it to Cut a Half-Square Triangle -
TURN the ruler so that you can read - This way for a DIAGONAL cut -

Line up the RIGHT side of the ruler along the cut edge of your strips -
With the "black triangle tip" at the TOP RIGHT of the strip -
The bottom of the strips will line up with a line on the ruler depending on its width -
Using the other horizontal lines to keep the ruler straight -
Cut UP the LEFT side of the ruler -


TURN the ruler so that you can read - This way for a STRAIGHT cut -

Line up the RIGHT side of the ruler along the cut edge of your strips -
With the "black triangle tip" at the BOTTOM LEFT of the strip -
The top of the strips will line up with a line on the ruler depending on its width -
Using the other horizontal lines to keep the ruler straight -
Cut UP the LEFT side of the ruler -


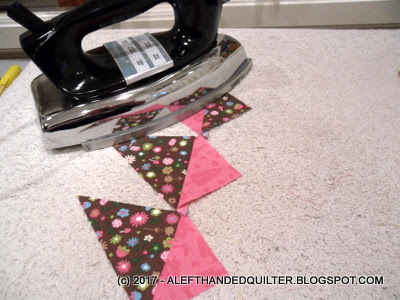
Sew them along the LONG/DIAGONAL side - starting at the "flat" end -

Press them open -

Use the diagonal line going from the corner to the center of the long side to trim the dog-ears -
The numbers down the LEFT column will help line up the bottom of the HST -
(The prototype has the numbers in this column reading 6-5-4-3-2-1 -
this is the second of 3 "cosmetic" changes that I made for the final version.
In the final version - the numbers will read 1-2-3-4-5-6 from top to bottom.)

Does it "measure" 2-1/2" square? -
Yes, it does - ;))

===
How I use it to Cut Quarter-Square Triangle units -
To make an Hourglass Block -
Using two contrasting strips - right sides together -
TURN the ruler so that you can read - This way for a DIAGONAL cut -
And make the first cut exactly the same way you did for a HST -

TURN the strip -
So that the cut edge lines up with a horizontal line on your cutting mat -
Using the DIAGONAL lines -
Line up the RIGHT side of the ruler along the cut edge of your strips -
With the "itty bitty - black triangle tip" at the BOTTOM LEFT of the strip -
The TOP of the strips will line up with a line on the ruler depending on its width -
Using the vertical lines to keep the ruler straight -
Cut UP the LEFT side of the ruler -


TURN the ruler -
Line up the RIGHT side of the ruler along the cut edge of your strips -
With the "black triangle tip" at the TOP RIGHT of the strip -
The bottom of the strips will line up with a line on the ruler depending on its width -
Cut ACROSS the TOP side of the ruler - From LEFT to RIGHT -
One HST - and two QST -

Sew the QST along the SHORT side -
Keeping the same fabric on top -
And sewing from the "flat" side -

Press them open -

Match the two sides -

Stitch them together -

Trim the dog-ears -
Using the diagonal line going from the corner to the center of the long side -
The numbers down the LEFT column will help line up the bottom of the block -

Do they measure 4-1/2" square - Yup! - ;))

If you cut QST in sets of two - you can start and end with a HST - ;))

===
How I use it to Cut a Flying Geese Unit -
I took two of the QST from above to use as the "Geese" units -

And used two strips - folded over onto themselves -
Because you need two "mirror image" "Wing" sections -
You need both a LEFT and a RIGHT wing for each "Geese" section -

I layered the pink strip on top of the brown strip -
To cut four layers at the same time -

Cut the HST just like before -


Opened them up -

Matched them to the "Geese" units -
With the "flat" sides at the top of the unit -
And the "pointy" ends at the bottom -


Started with one of the RIGHT "Wings" -
And put it on top of the "Geese" -
Right sides together -

Stitched them together -

Pressed them open -
Added the LEFT "Wing" -


Pressed them open -

See the "extra" pink on the right side -
That's for your 1/4" seam allowance when you sew it to the next unit or block -
So you don't cut off the point -

Trim the dog-ears like you did the HST -

And it measures 2-1/2" x 4-1/2" - ;))

So -
From two pre-cut 2-1/2" strips - I made all of this -

Which can be arranged to make this -

Or this -

Or this -

The possibilities are endless - ;))
===
Bottom line -
No more "flipping" rulers - OVER - BACK - or SIDEWAYS -
The numbers go in the CORRECT direction -
And are EASY TO READ -
Because -
It's LEFT-HANDED!! - ;))
Would I recommend this ruler?
YES - ;))
===
Talk to you later - gotta go - gotta sew -
2 comments:
This is a test - ;))
I wish I would have had your ruler when making my last quilts hour glass units. The pictures are worth thousands of words. Thank you, looking forward to being able to have your ruler in my hands and I do not like to cut fabric.
Post a Comment